Creating a Marching Practice Field with a Dotted Grid:
A How-to-Guide from Start to Finish
This time of year, we start preparing for the next marching season, and a big part of those preparations is the practice field we’ll be working on. I’m fortunate where I am to have access to a parking lot near the stadium, a grass field outside our band hall, and then the turf game field as the season goes on. Having three surfaces is a nice luxury to have, but if I had to just choose one to spend time teaching drill on it’ll be the asphalt every time. The reason simply is that it is the easiest surface to ‘grid’ off and makes learning drill much more efficient!
Most schools have asphalt available in some shape or form, but some don’t have it lined off. In 2022 our school resurfaced our lot and we had the opportunity to start from scratch on the new surface. We took advantage of that this summer to re-line/dot the field. I know many people find the process intimidating, but other than time, sweat, and paint, it doesn’t need to be. This tutorial aims to walk you through the process from start to finish. Please feel free to reach out to me if you have questions that I don’t answer. For our field, in Texas we use NCAA hashes, so the measurements given will be consistent with those. You may search online and find the HS hashes that some states still use.
These instructions will also work on a grass field, I know a few people who have used the grass surveyor flags with nails to do dots on grass. Given we are not the only ones who use our grass field I feel like that’s a little bit of a risk if we lose a nail and someone gets tackled into it. We tend to use our grass field as a transition field to get used to not having those marks.
Preparation:
- Decide where the field will be placed:
- For many schools, this is just going over the top of an existing field at this point.
- If you don’t have an existing field you are looking for as close to at least 300’x160’ as you can get to make a full field (330’ if you want endzones)
- Don’t have that much space? It might not matter! Smaller bands may be able to use a smaller width or depth and ‘make it work.’
- Our asphalt field only goes back 130’ in depth, but as a small band, I don’t use that back area closer to the visitor sideline anyway.
- Drill designers should be able to consider your practice space as they design – just let them know up front! (Also any trees, light posts, or other oddball things!)
- Paint:
- What are you using to spray?
- Most districts should have an athletic field sprayer that is gasoline-powered. In my opinion, this is the most ideal/economical way as you buy buckets of paint and run through the machine.
- We used about 2 buckets to do our field from start to finish of the white paint for our field lines.
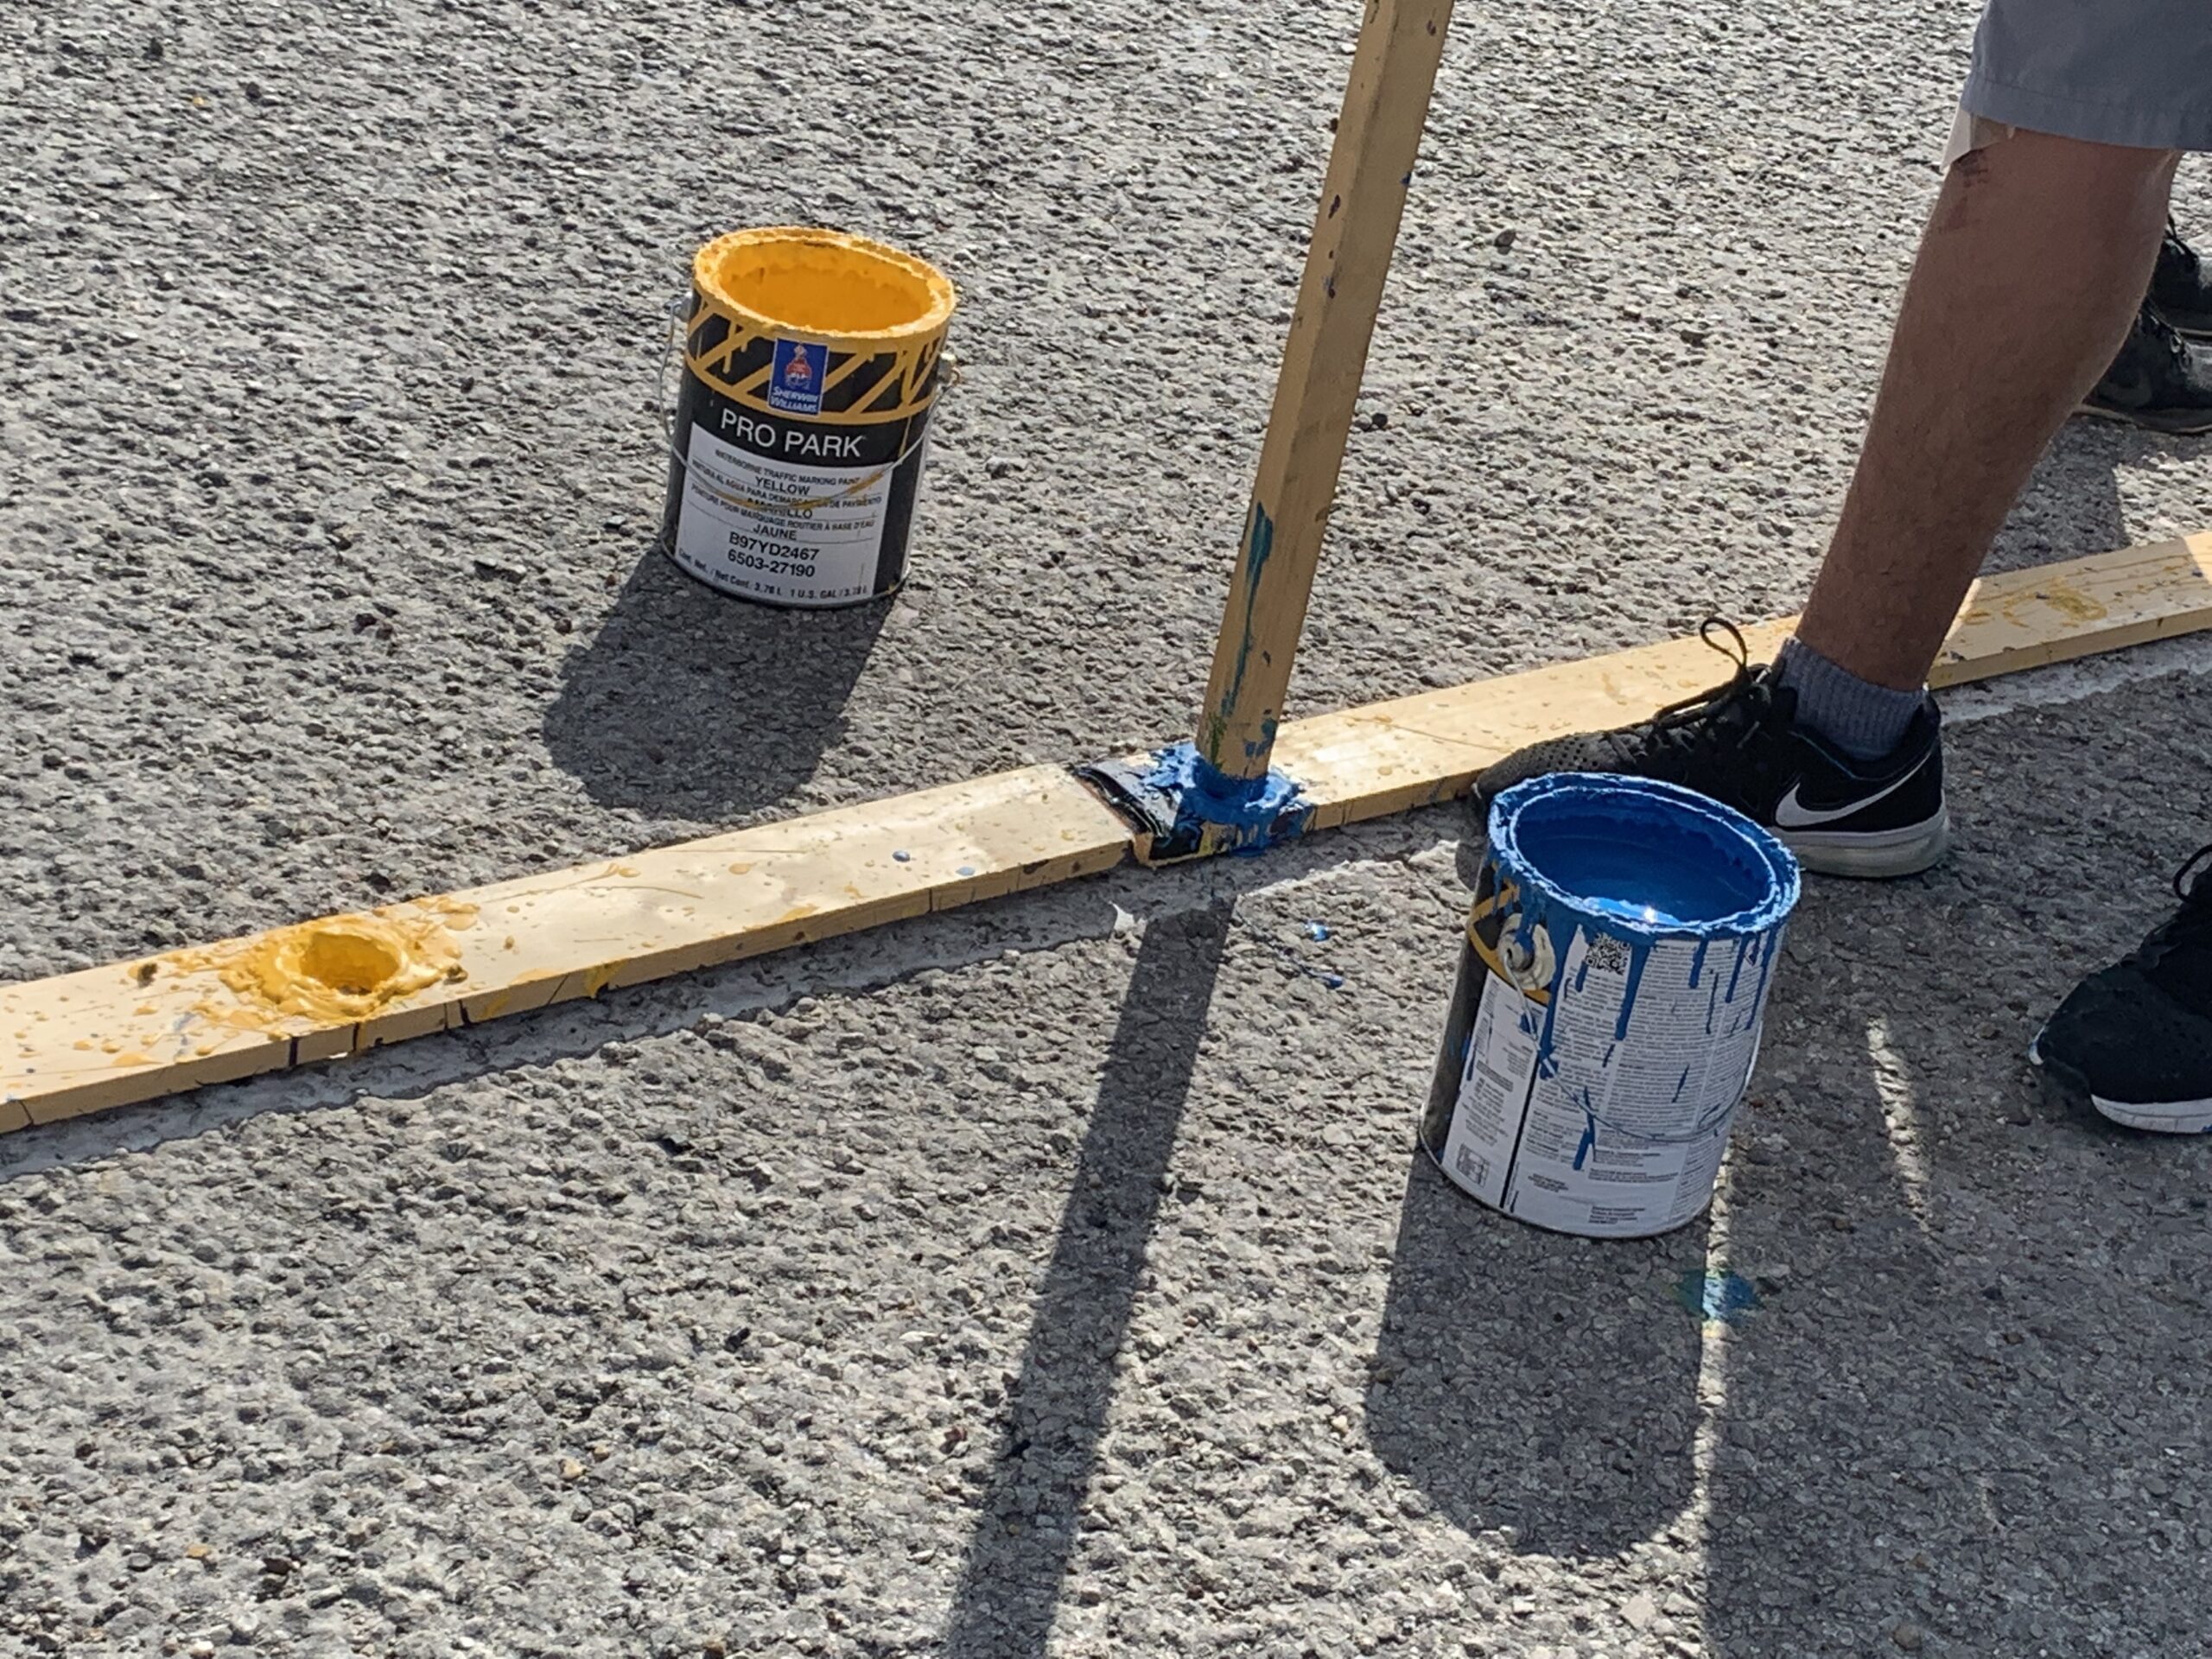
- I used one 5 Gallon bucket for each of the two colors for the dots when I got to them. (Our school colors are Blue and Gold, so Blue/Orangeish Yellow are the colors we used)
- There are spray paint-based sprayers that we’ve used in the past for our grass field for sale by BandShoppe and others. Their paint doesn’t spray as cleanly in my opinion but they do work! (Band Shoppe’s current one is Krylon Athletic Marking Sprayer) It will take about 6-12 cans usually to do a field from start to finish in my experience for the field lines. It’s probably 30+ cans of spray paint I think for the dots.
- Rolling it: Many companies that paint parking lot spaces roll it out with a brush and roller. It’s an option if you’re careful with string, but I don’t find it easy. This also will not work well if you have older asphalt with lots of loose rock.
- Most districts should have an athletic field sprayer that is gasoline-powered. In my opinion, this is the most ideal/economical way as you buy buckets of paint and run through the machine.
- What are you using to spray?
- Measuring/Marking Supplies:
- Tape Measure(s): You need at least one 300’ Tape Measure. (A second one can come in handy for the right angles I’ll talk about later)
- String: Home Depot sells string for this purpose in bright neon green, orange, or yellow. One roll of it should be enough.
- Number Stencils: If your football field is grass you should have a set of stencils somewhere. Our district had just put in turf and thrown out our old stencils. We ended up having to purchase a new set for this project for about $500. (0, 2, 3, 4, 5) US Specialty Coatings made those for us and were the most affordable we found. Be sure you get stencils that are regulation size for your purpose. In our case 72” (6’) was needed.
- Hash Stencils: If you do have stencils you should have a set for hashes too. They make it a lot easier to cleanly spray them. I did not repurchase these, instead, I did it by sight. (I can get pretty close, but it’s not perfect)
- Marking Spray Paint: I don’t use this often in the process, but getting a can or two of ‘marking paint’ to make marks can be really helpful.
- Chalk Line: A chalk line can be really handy for putting a temporary mark down for reference. I used them for number stencils to line up the top. You could use them to help with Hash marks too.
- Dotting Supplies:
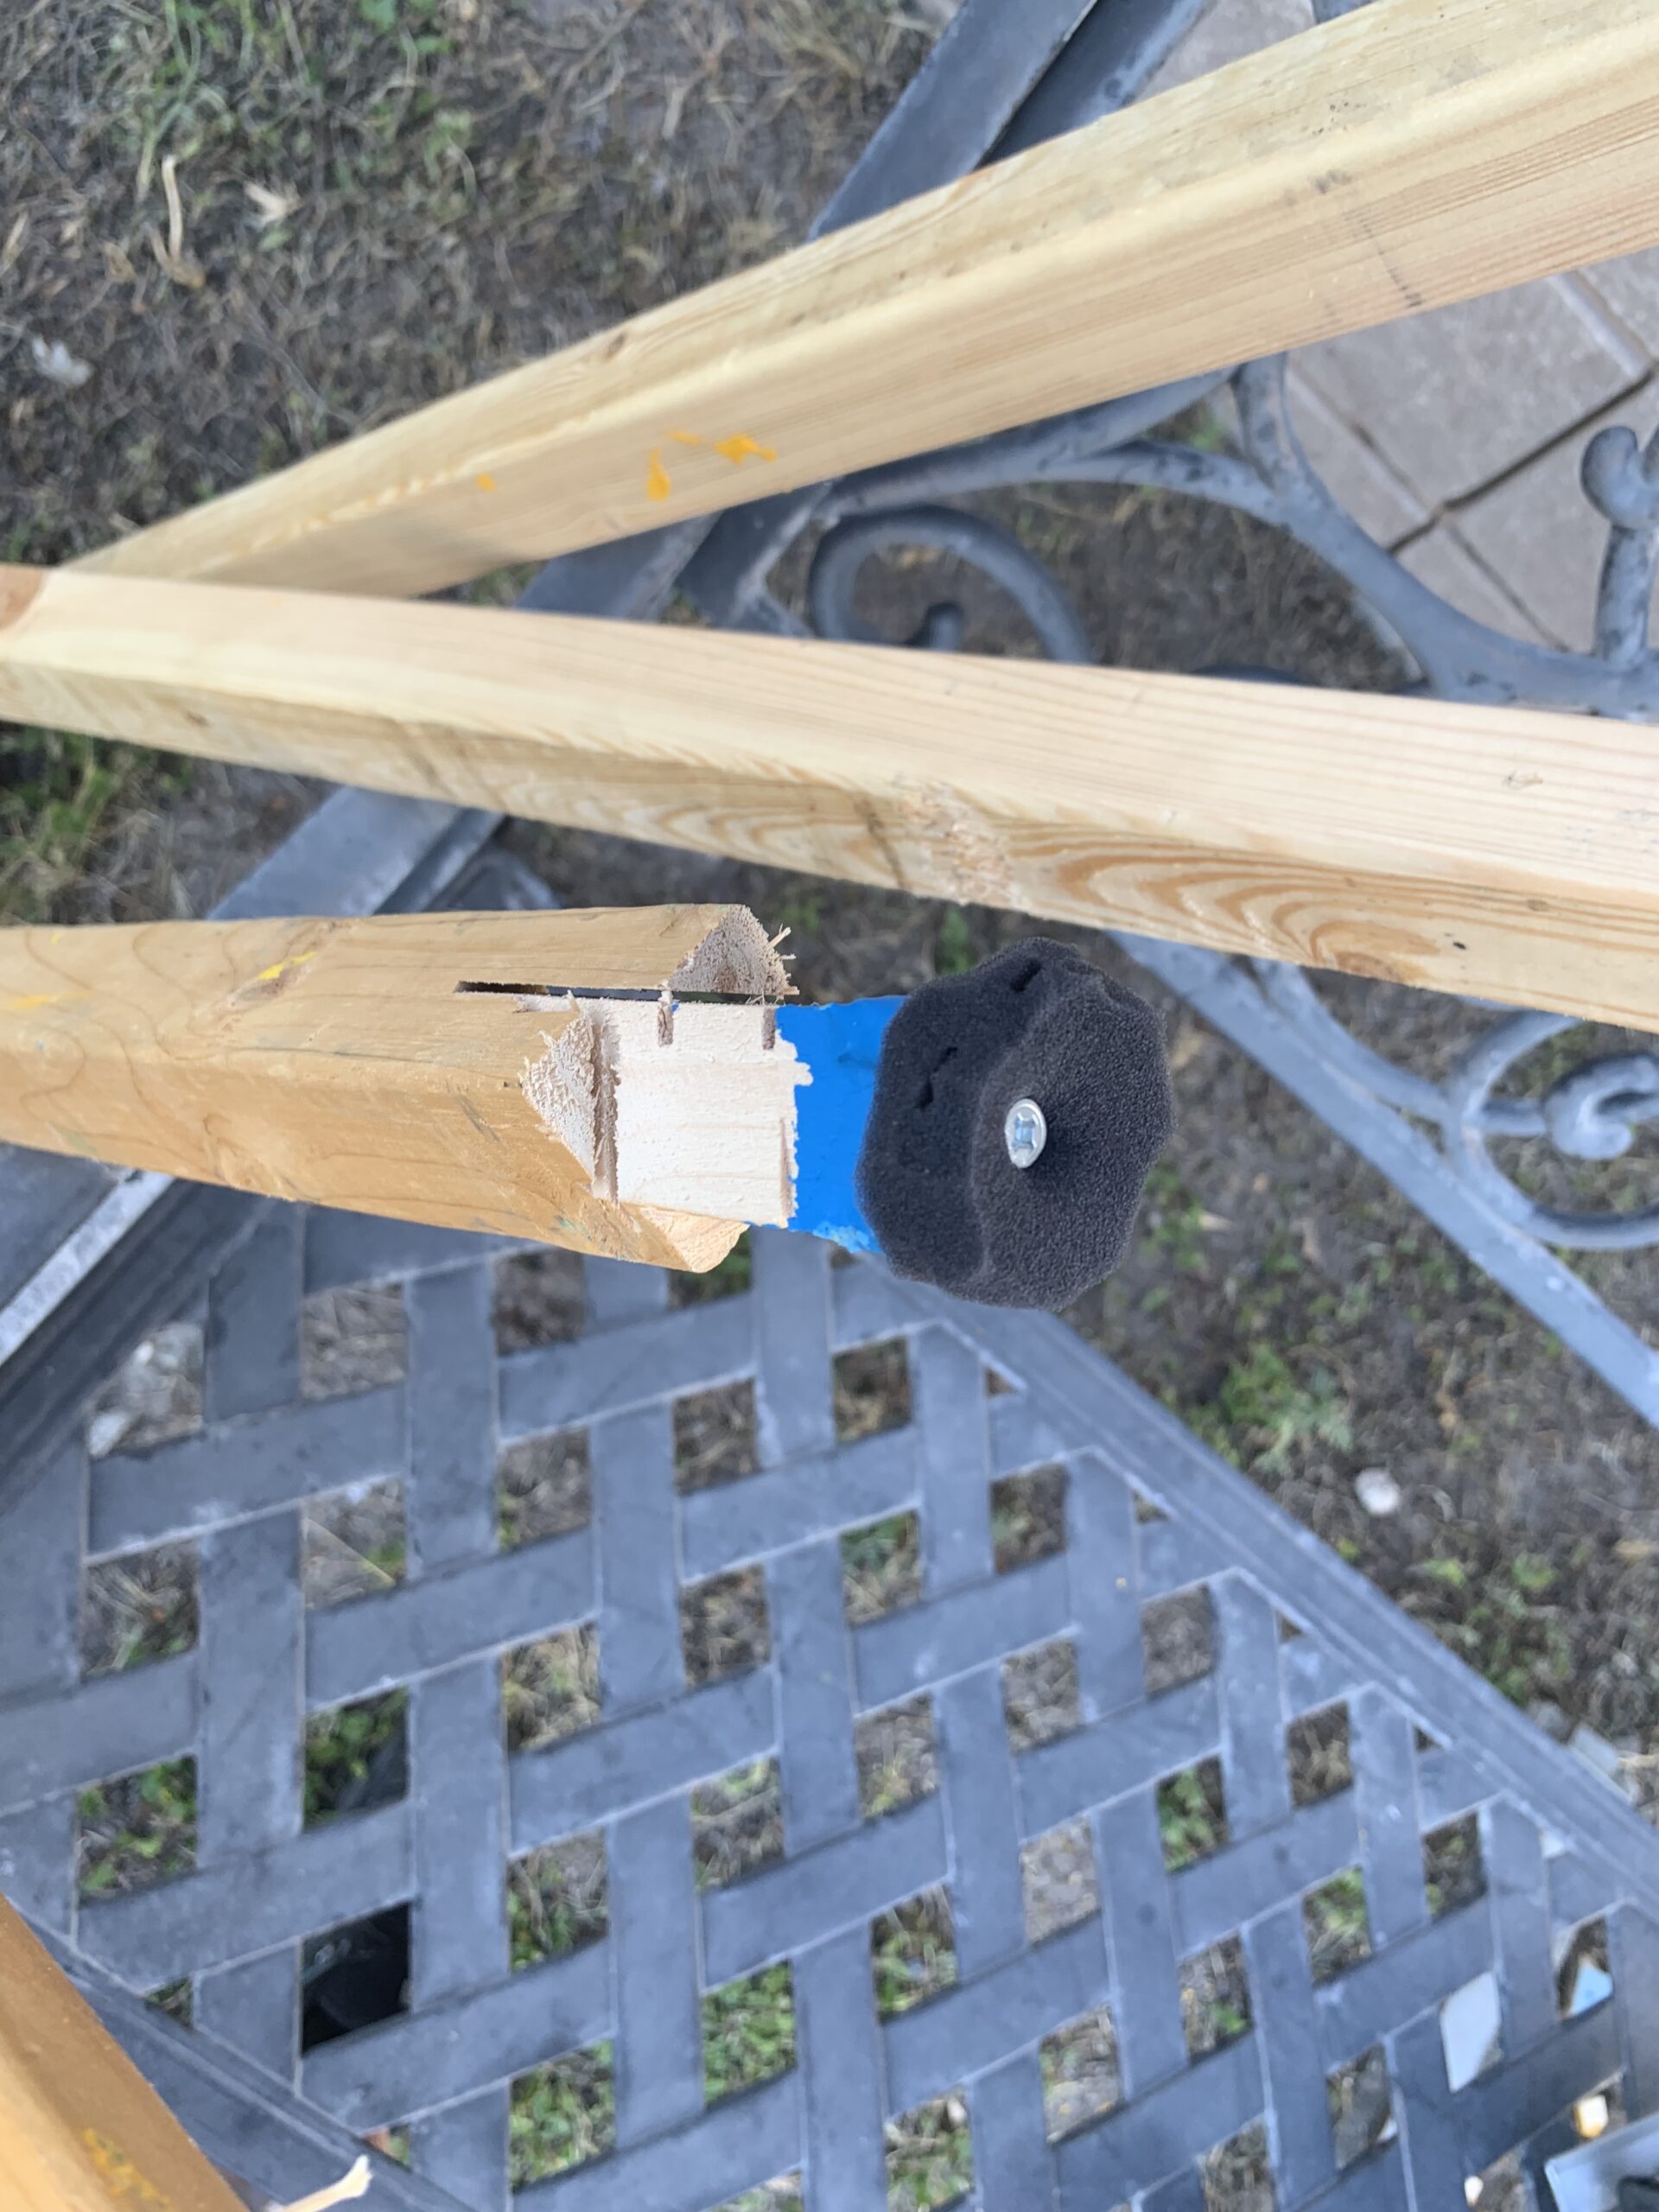
- 2 1”x4”x10’ Boards
- Hinge (Screws to attach
- 2.5”-3” Wide Drawer Handles (Don’t go larger than 4”!)
- 2” Circle Cutter Drill Bit
- Drill
- 2 Buckets of Colored Paint (2 Colors – Also mentioned above)
- Directions on the Dotting Board Templates are below
- Helpers: The lines can be done with 3-4 people without too much trouble. Less than 2 you need to have a way to weigh down the string and it can be tricky. For dotting, I would say 5-6 to trade off jobs is the best there!
Dot Board Templates:
Ever since the trend of dotting fields came out I’ve seen a few variations on how to do it. Over several attempts, I have tried quite a few methods. The first time I used a 4’x 8’ piece of plastic cardboard (corrugated plastic). The thought was it would have more holes in it and be more efficient. Due to inconsistencies in measurements, as well as how the paint was built up on the material, this definitely wasn’t the best way. The next time I discovered the 1”x4”x10’ boards hinged together. This is the most reliable method I’ve found. There are a couple of companies out there that do this that may have another way of doing it – if you have another suggestion I’m open to them!
Step 1: Attach the Hinge to the Two Boards securely to let them lay flat and straight.
Step 2: Use your chalk line to put a center line going straight down the two boards.
Step 3: Starting about 3” in from the edge of the board put your first center mark for a dot.
Tip: Mark an asterisk at this point so you know where you measured from. Use the same measuring tape you’re going to use for the field because it will help with accuracy!
Step 4: Measure 22.5” from that first mark along the board and mark the next mark.
Step 5: Continue and it should be 11 marks if you’re using the 10’ boards. Make sure you’re careful that you don’t hit the hinge points – adjust the dots if you need to.
Step 6: Use a ¼” Drill bit to drill into each of those marks to start the holes
Step 7: Use your 2” Circle Cutter Bit to open up those holes for the dots.
Step 8: Add the cabinet handles to the top of the ends to help in grabbing the boards while you’re painting.
Field Lines
This step could involve help from maintenance in your district if you have a reliable field crew. Due to the measurements being so critical that they are absolutely accurate, I prefer to do them myself. I’m going to walk you through the easiest methods I know to do so here. String and tape measures are essential here! Most of the methods to get the lines you need are going to involve geometry we all have tried to forget from school. The important thing you need to remember is the 3-4-5 triangle here from math classes!
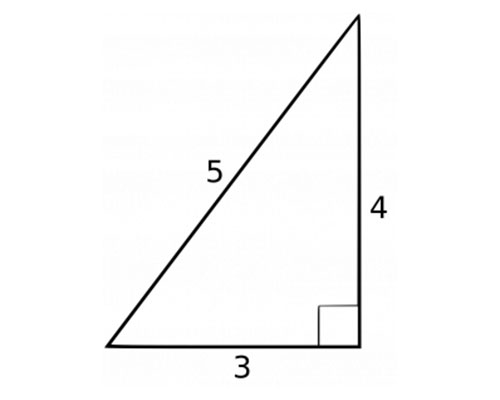
The triangle lets you generate the ‘right angle’ (90 degrees) to get your yard lines perpendicular to the sideline. I keep a handy little cheat sheet in my notes on my phone. Below you will find a refined version of this as well to save you from the math! I highly recommend having it saved to your phone or printing it and taking a copy – I know my brain has math troubles when I’m sweating in the hot sun!
Step 1) Measure the width of the field you’ll be using. As I said above, not everyone ends up with a full regulation field – that’s okay! Just make sure you maintain accuracy as we move through this process. If you have the full 160’ width for end zones that’s how long you’ll want to mark here. Measure that distance and determine your endpoints.
Step 2) Use two people to hold the string that distance you are using tightly against the ground. Measure twice, paint once! Make sure the line is parallel to whatever lot you’re using as best you can. This is the line everything is based on, so make certain this one is where you want it!
Step 3) Paint down that sideline while they hold the string down. I try and stay as centered with my spray on the string as possible. As long as you stay over the string you will end up with a decent line. I tend to come back over this line with a second coat to help widen/even out that line.
Step 4) Mark the center on that line where your 50 Yard Line will be. I use spray marking paint to just put a small dot right there. Measure out from that line in each direction at 15’ intervals and mark your yard lines. If you’re doing endzones keep track of where the Goal Line is, and it’s a 30’ distance to the back of the endzone.
Step 5) Painting the Fifty Yardline: This is probably the second most important line you will measure/paint and by far the one you have to mentally consider the most. Look at the chart below:
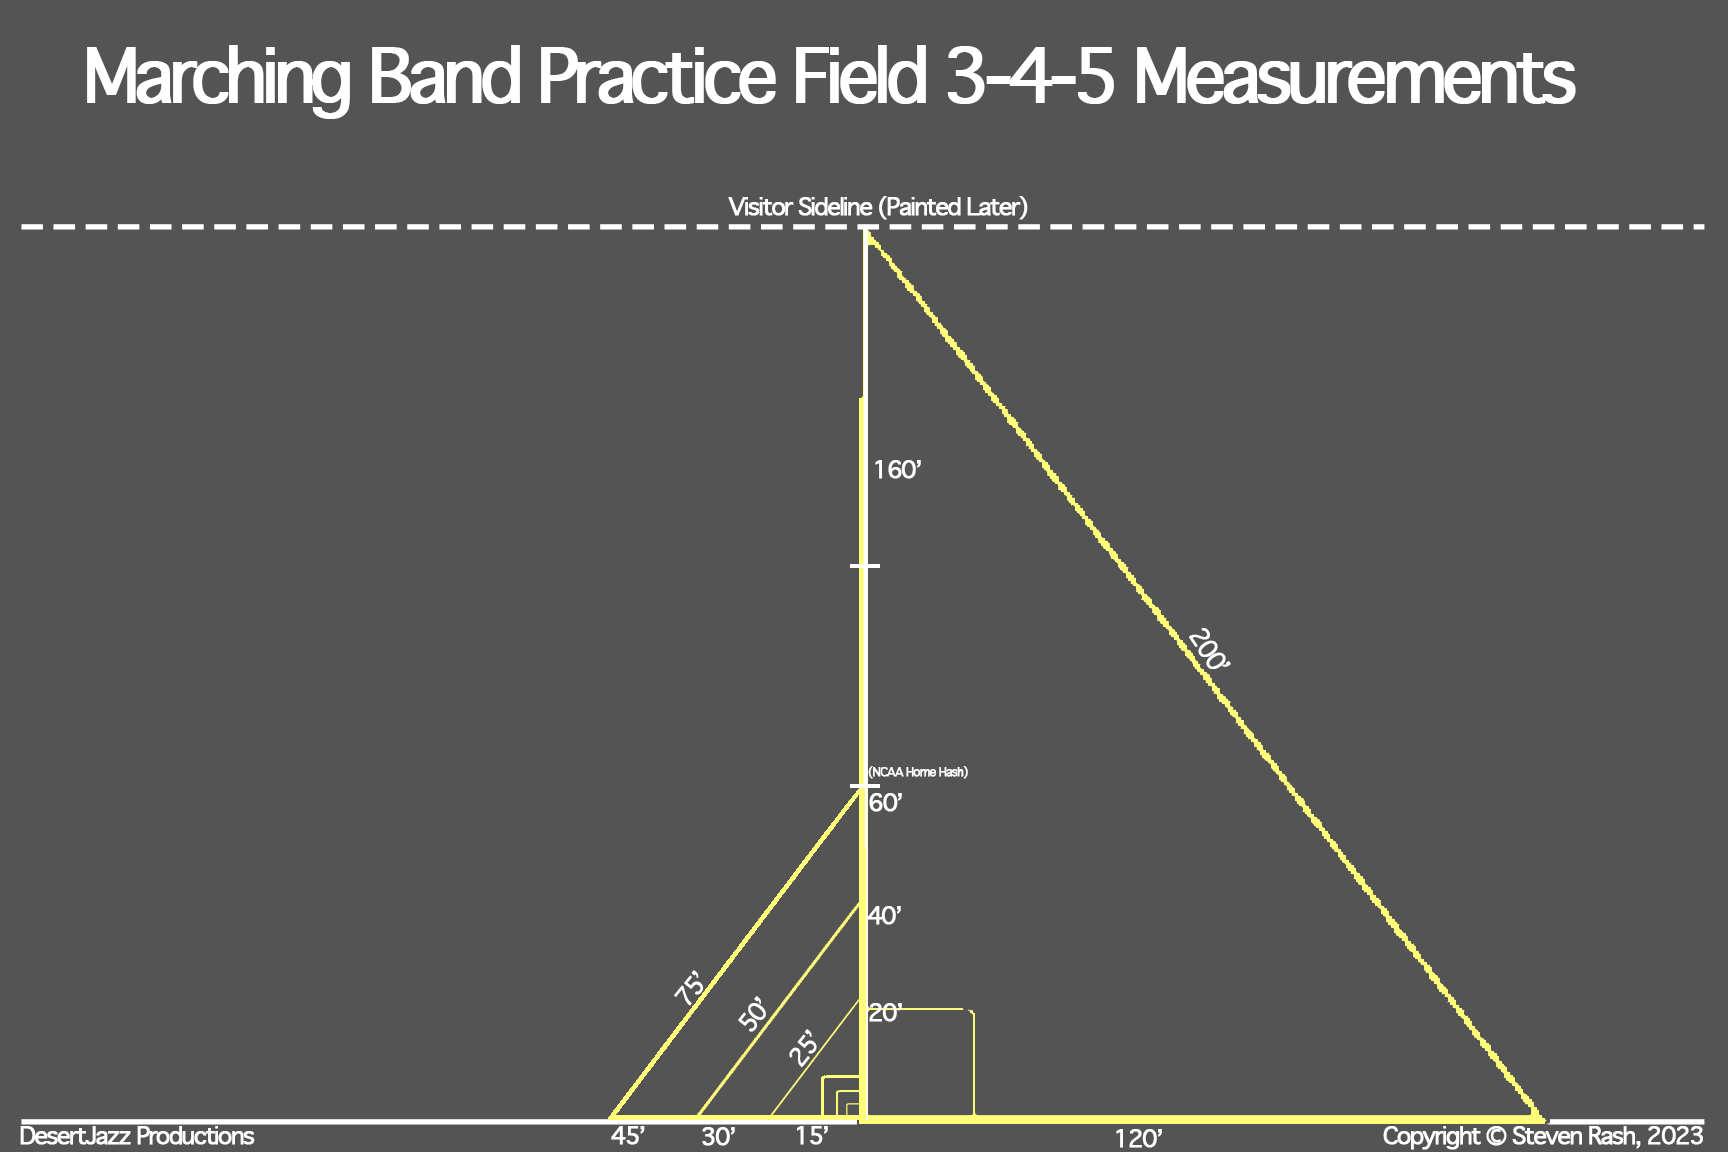
Step 6A) Here we are going to use the 3-4-5 Triangle principle I mentioned above. On the left side (Side 1) of the field I have three separate triangles. Put the zero of your tape measure down on the fifty-yard dot you made and have someone hold it down there. Go 15’ to the left then, and have someone hold that down on the 15’. Then you’ll need to measure the hypotenuse of 25’, so add that to the 15’ and you’ll measure to 40’ on your tape measure. Have someone hold there, and go back to the 0 with the line. (You’ll be at 60’)When your tape measure is perfectly tight, that person at the top of the triangle should be on the 50 Yard Line. Mark that spot with a small dot of paint.
Step 6B) Now measure the next triangle size the same way. So it’ll be 30’ going out from the 50 YL, then you add the 50’, so it’ll be 80’ at the top of the triangle and 120’ at the zero when you pull it back to the sideline. Pull those points tight and paint another small dot here.
Step 6C) This will be the larger triangle on the left. So out 45’, the top will be 120’, and the return will bring you to 180’. Once again paint a small dot.
At this point hopefully, if you’re looking at those points you’re pretty close to a straight line. There is usually a small amount of play, so you may have to average the center at the end there.
Step 6D) Hopefully you have a second 300’ tape measure, as it makes it easy to do one last check here and do the largest triangle there on the right. I would take the 0 of one tape measure out to 160 and roughly guess with those marks on a straight line back to the sideline (it’ll have the 160’ mark), and then go an additional 120’ to hit 280 along the sideline. Use the second tape measure to measure 200’ to make the triangle complete. Paint a dot then.
If you don’t have a second tape measure, you can go ahead and get a little closer with a 75’, 125’, 100’ triangle that will finish off a 300’ tape measure. Then just measure the 160’ out and center it on the marks you do have. It gets it close enough, but the 2 tape measure triangle refines it a little bit more.
Step 6E) Use a string with your marks and center it as closely as you are able. Measure 160’ to triple-check that distance from the front sidelines if you have the full-size width.
If you don’t have full-size width, that is fine, just make sure you measure what you do have. For NCAA hashes if you at least get back past the visitor hash for smaller bands you’ll be fine. Keep track of how far back you go, as it will be important for the next step.
Step 6F) Once again, make sure things are where you want them, and paint over this line. Like the front sideline, I tend to give the 50 Yard Line a second coat. There tends to be a lot of traffic on that yard line no matter the size of your band!
Step 7) Visitor Sideline/Back Parallel Line measurement:
Up until this point no matter if you have the full depth or not, there haven’t been any differences in this tutorial. If you don’t have a back sideline you have a couple of choices you can make for continuing. You can use these next steps and put down a chalk line. A chalk line makes a line by pulling the line tight, then snapping it against the surface, leaving a straight line of chalk that will wash away later. This can be used to help you make the rest of the field straighter and would be my first recommendation so you do have those two parallel lines you’re measuring from.
You can just measure 15’ from the end of your 50 YL though at the end, the middle, and front sideline, and get close enough for most too. When you’re dotting the field though I recommend going as precise as you can!
For this part, you’re essentially going to work backward with the triangles you just did.
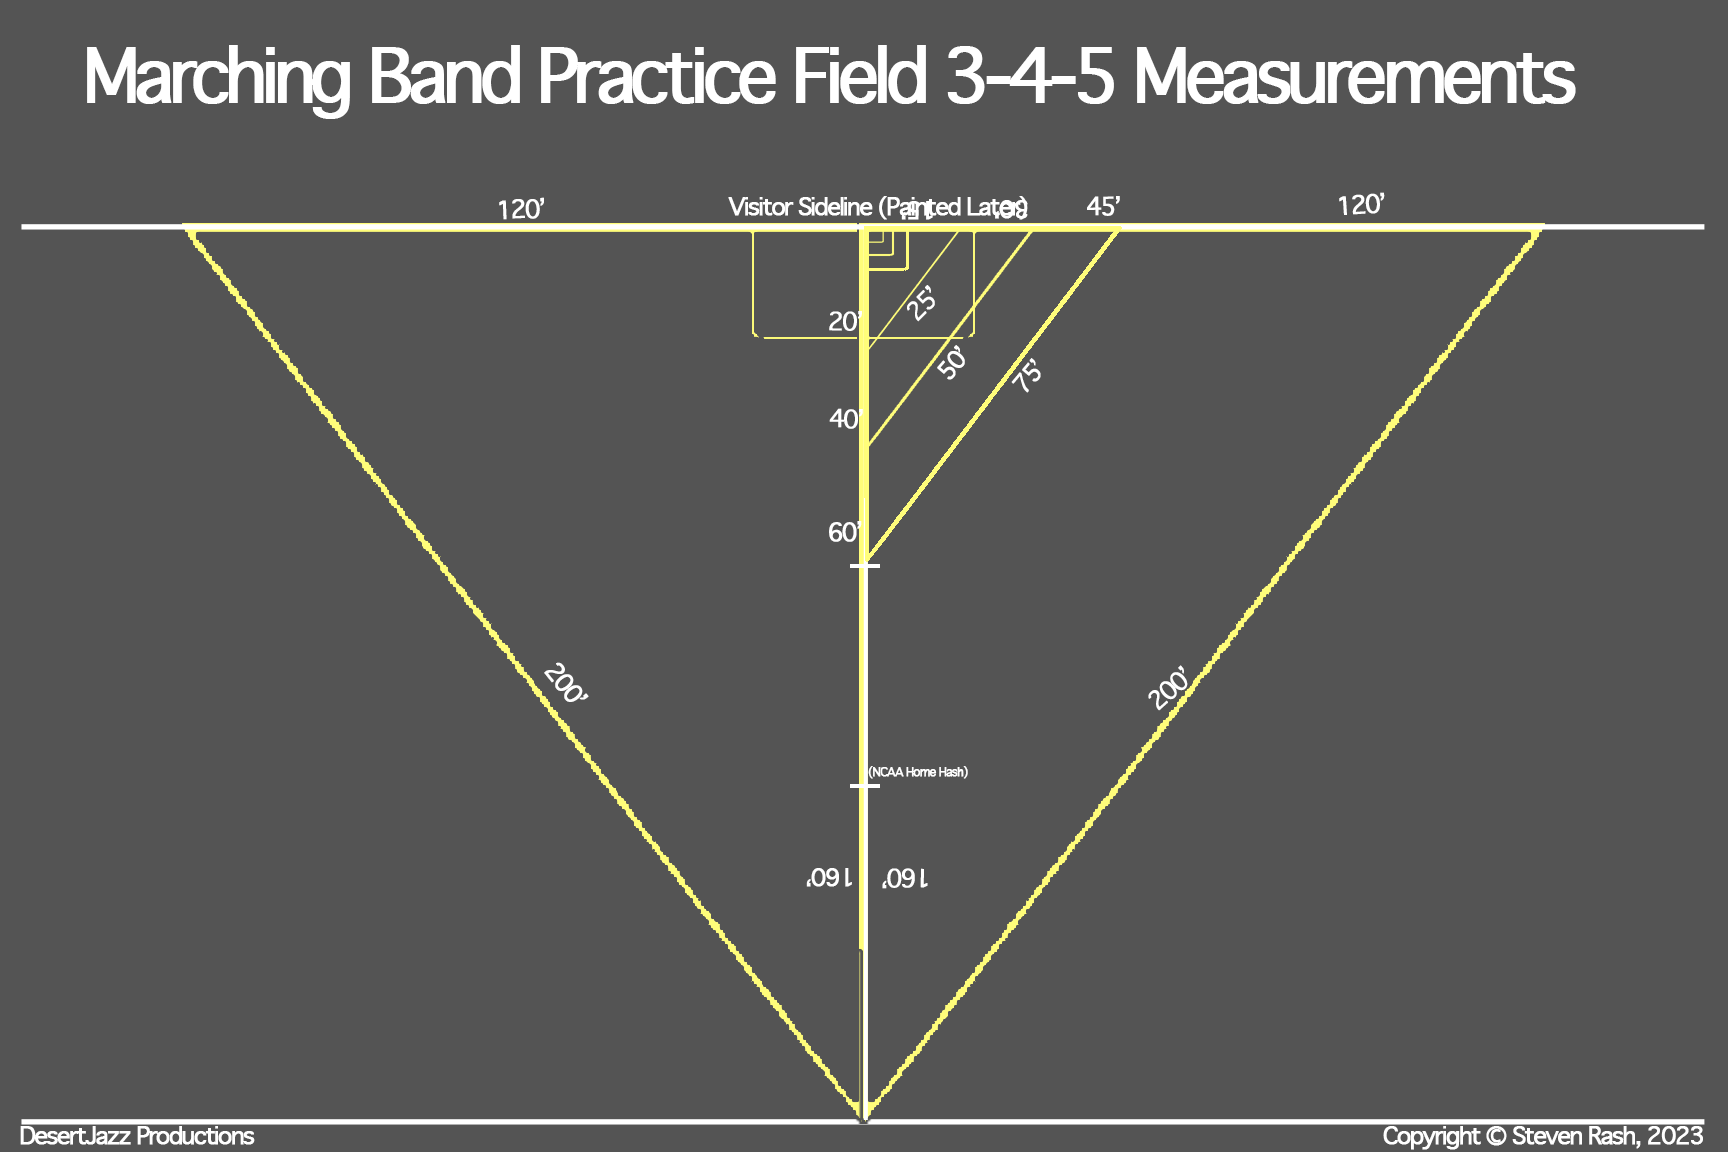
Step 7 A, B, C, D, E: So, start with the small triangle, and measure out that set of 10’ from the end of the line down the 50 YL, then go 25’ back to what will be the sideline to the right (45’ on the tape measure), then back to the starting point which will be at 15’ (60’). Do the second, third, and fourth triangles the same as well. You can do both of the large triangles on either side of the field to try and verify too.
Step 7F: Place your string along the back sideline, pull it tight, and measure your 160’ if you’re doing full width. (You could measure 80’ and right and 80’ left from 50 YL along your sideline too)
Step 7G: Paint the line down. Again this is a double-coated line to me if you’re doing it.
Don’t have full depth? We do the same process and use the chalk line. You just stop at the line and use it instead of painting in step 7G. You just use that line. You could also alternatively use normal string and ducktape the ends down or keep it held down with some willing students while you measure the next part!
Step 8: Now that you have your back parallel line, use that to mark out at 15’ intervals going out from the center just like you did with the front sideline. Put a little dot at each of those spots.
Step 9: Take a piece of string and line it up on what will be your 45 on both sidelines.
Step 10: Paint that line down, and repeat for the rest. Do your yard lines, and end zones if it applies to your space.
If you haven’t marked the back sideline you can measure multiple points out from the 50’ and get pretty accurate with this line too. I find I’m closer using the above method though.
Field Markings
At this point, I’m usually beginning to feel pretty good about myself that it’s looking like a football field! Time to put down the standard markings!
Step 1) Know YOUR Hash Marks. Your competition circuit rules are really important to know here. In Texas, we use the NCAA dimensions for our fields. Some states still use high school hashes (set wider apart). If for some reason you have any interaction with Pro Fields they are closer together. The number of times I’ve been on a field someone has painted the wrong hashes on is sadly not zero! Please triple-check your rules and paint these accordingly. I’m giving directions for NCAA in this case!
Step 2) For NCAA: Measure 60’ from your front sideline along your fifty and mark it there. (Should be marked from initial triangles, but could be covered). From there you’ll go another 40’ back to reach the visitor hash at the 100’ mark.
Step 3) Go to your furthest yard line out on each side and repeat Step 2. (If you went out to goal lines you will not put hash marks on the last yard line or endzone line.)
Step 4) Have either a couple of people hold a string across this mark on the front hash marks, or you can use a chalk line and mark it too.
Step 5) If you have Hash mark Templates, use them to go across the field along that line and put your hash marks in. If you’re just eyeballing it, line up on the string, and with a gasoline-powered sprayer I find leaving the front tire on the yard line, go across it, and you can figure out an end spot. They should be 24” wide to be regulation width according to NCAA. The most important thing with hash marks is front to back!
Step 6) If you have a chalk line it’s easiest, or you can use a string here, but go 24” in front of your hash marks This is the distance your yard ‘ticks’ will move in front of the hash. You can make a PVC template piece to help quickly measure this, or Premark with marking paint these spots every 3’ between the Yard Lines. Again if you have a Hash template this is usually included and you just need to paint using the template.
Step 7) Repeat with the Visitor Hash marks. Remember the tick marks go towards the sideline. (I usually have to look that fact up)
Step 8) For many people this is enough, but if you have the number templates and or the Arrow Templates now is the time to use them. Your numbers should be 6’ tall. The top of the numbers sits at 27’ from the sideline. Most templates will line up the side with the yard line. The zeros can get used on every one of the yard lines (10, 20, 30, 40, 50, 40, 30, 20,10 (and Gs if you use them). The other numbers will mirror each side. Note that as you spray these they will be wet. Be careful lifting the stencils and moving them! Our sprayer has a removable wand, or you just spray like you do the lines until you fill in the stencil.
Congratulations, you now have a regulation practice field! On to the Dots!
Dots, Dots, Dots…
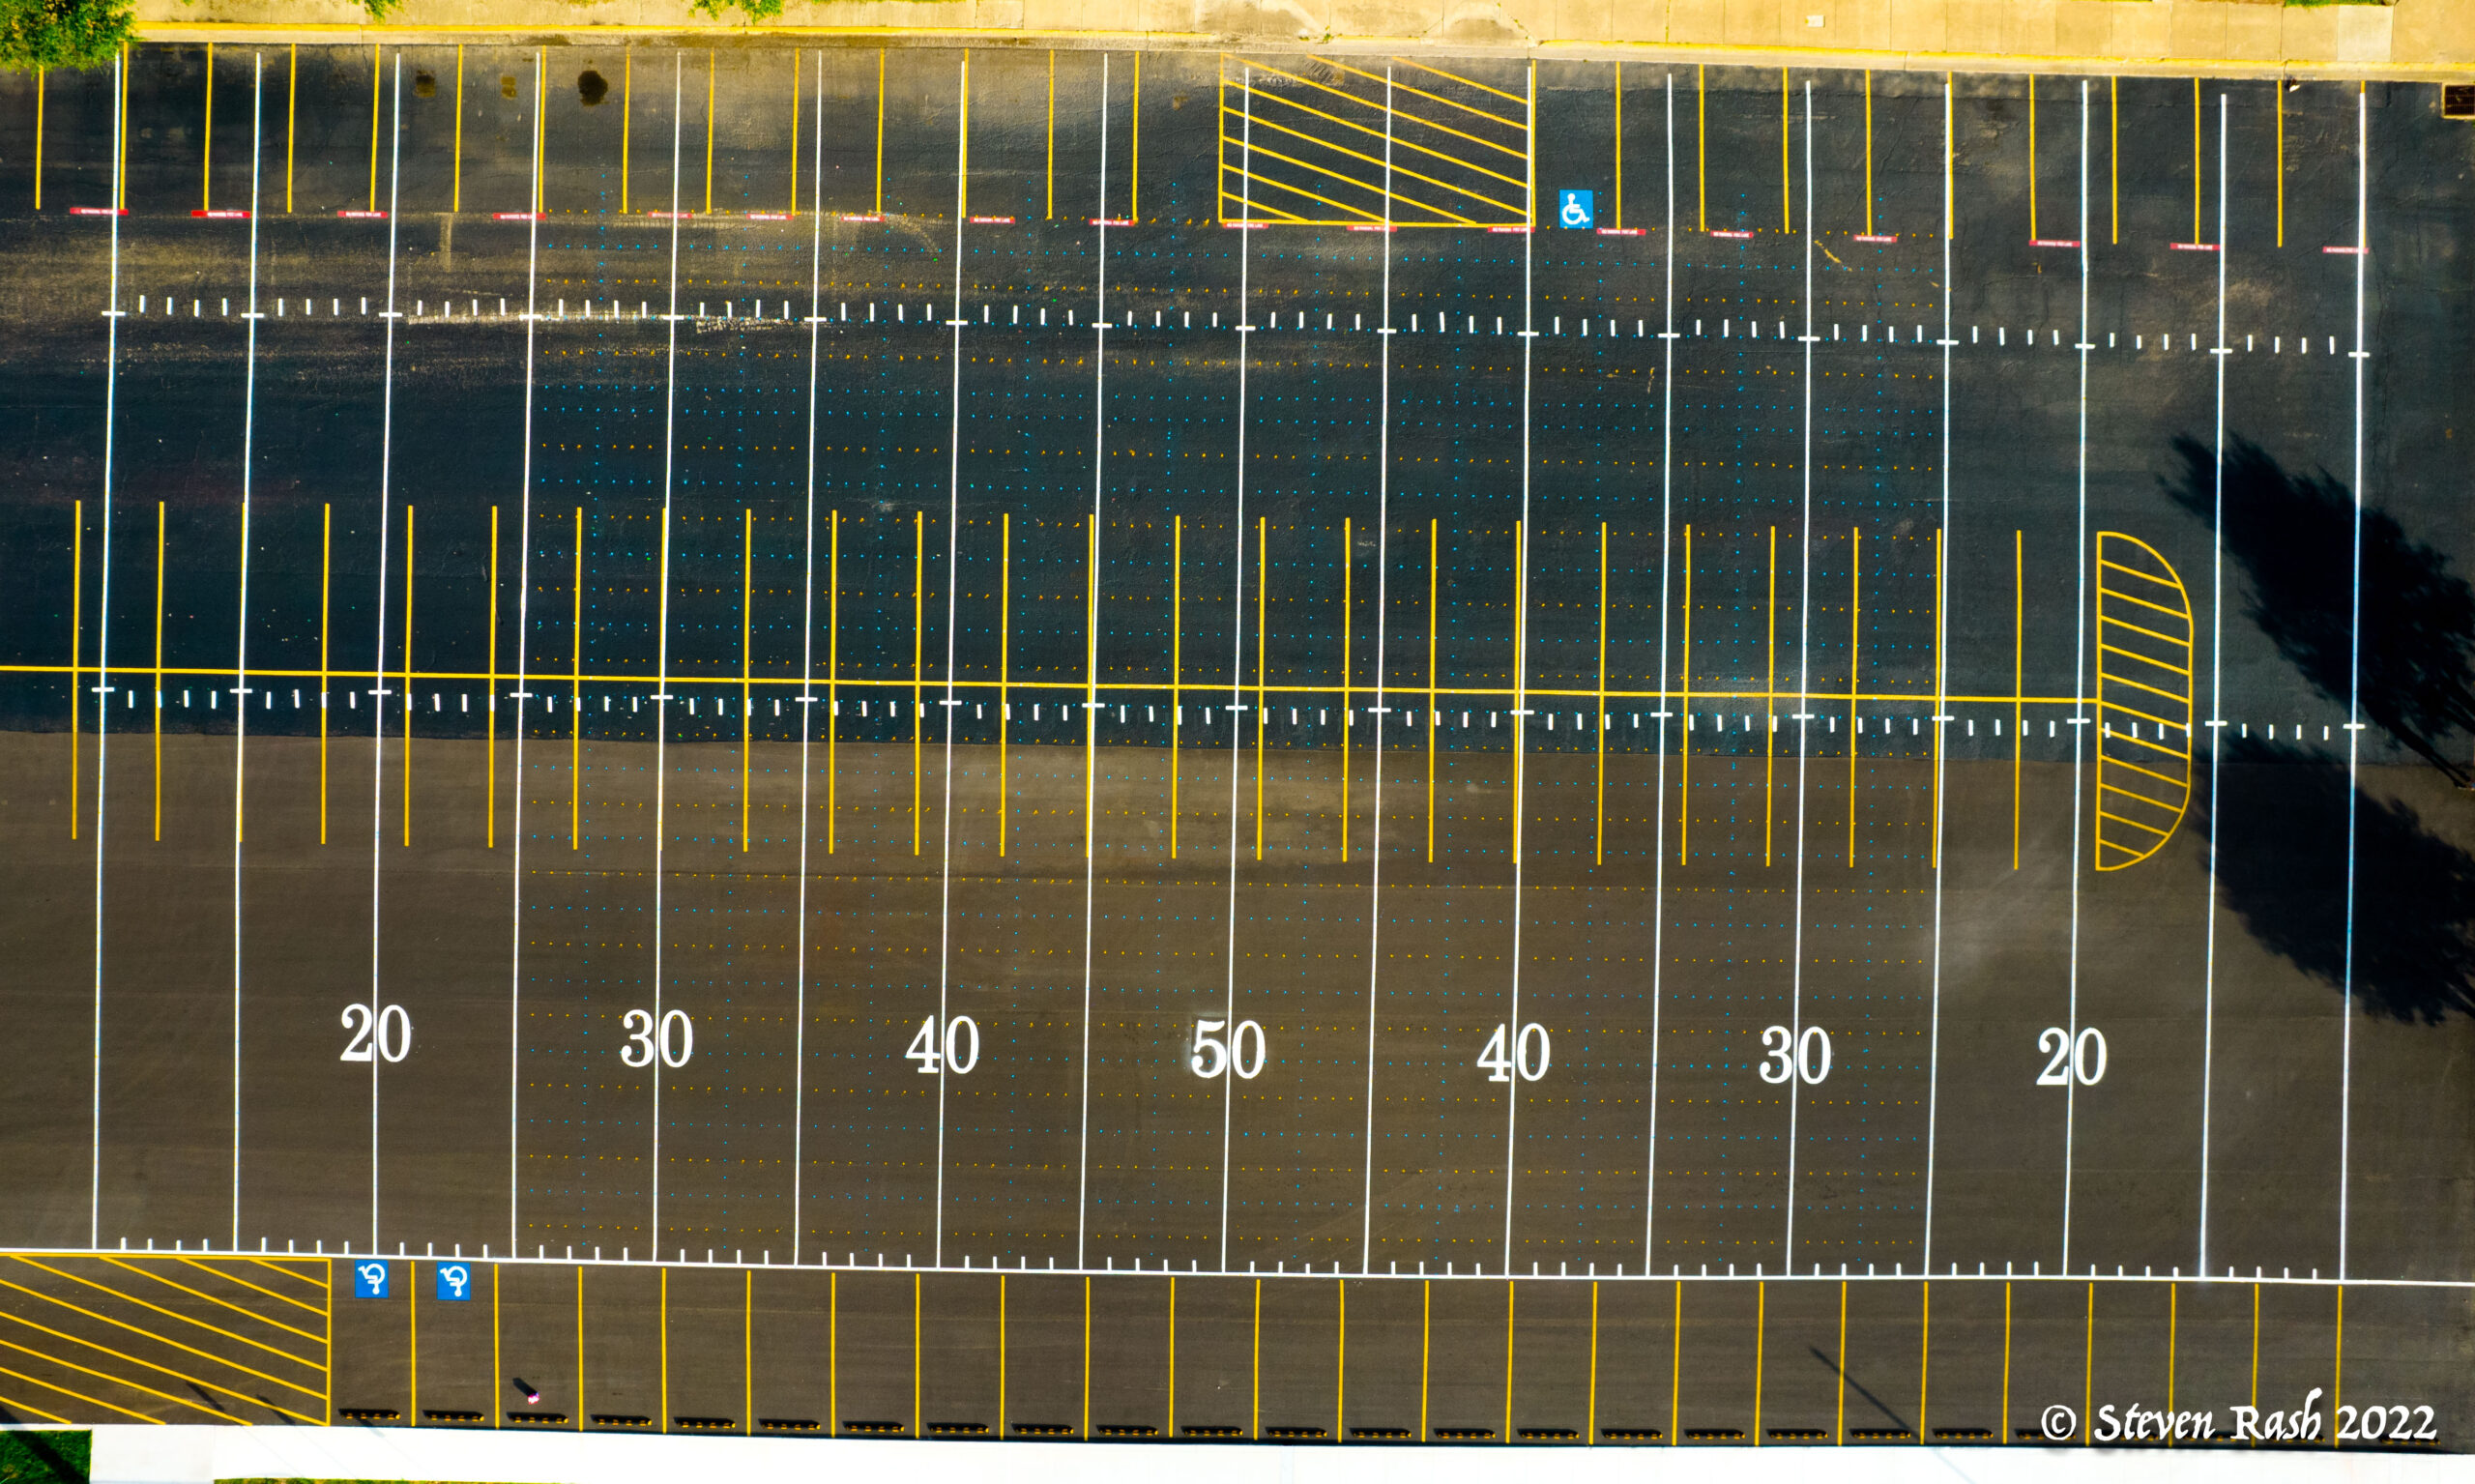
I remember growing up we had 4 step dots on our lines for our practice field. It wasn’t until about a decade ago I remember seeing someone going through and putting an entire grid on the field. My first thought was that it was so busy it wouldn’t be helpful, but it would help teach quicker. For our band it was a game changer, especially with Ultimate Drill Book as well, to speed up teaching drill, and increase the accuracy dramatically! The only downside to dotting the field is the time it takes to do it! As I spoke about above, I’ve done this a few ways over the years since we started. This year we used our district paint sprayer and the template above. I started with the 4-step color, then went back with the 1-step interval color. It worked well, and I think has the best chance of staying down longer.
One other approach I’ve had a lot of success with lets you use more students and move quicker. Make more of the templates, and then purchase 1×1 boards. I use gaffing tape to make a handle on them, and then on the other end cut circles out of foam paint brushes. They then become long paint brushes that you dip in paint, twist in the template hole, and then keep moving. This is the faster method since you can get a few boards and crews going and cover a lot more ground! On the one below I think I had 2x2s or the wrong side circle cutter and had to trim down the end of the board there.
The final method I’ve tried, and I know others do this, is to use spray paint. Spray paint can work well, especially if you get one of those remote can sprayers, but is by far more costly. I think it’s on the order of double or triple the amount of just going with the buckets of paint. It can work though, so I wanted to mention it here.
I’m going to go through the process we used this year with the paint sprayer, but it’s very similar.
Step 1) Sideline dots are first. Place your board down on the 50 – make sure you have the dot you started ‘0’ on the tape measure on the inside and measure out as you did for your yard lines. If you held the string tight to asphalt there should be some residual lines you can use to help find that center better!
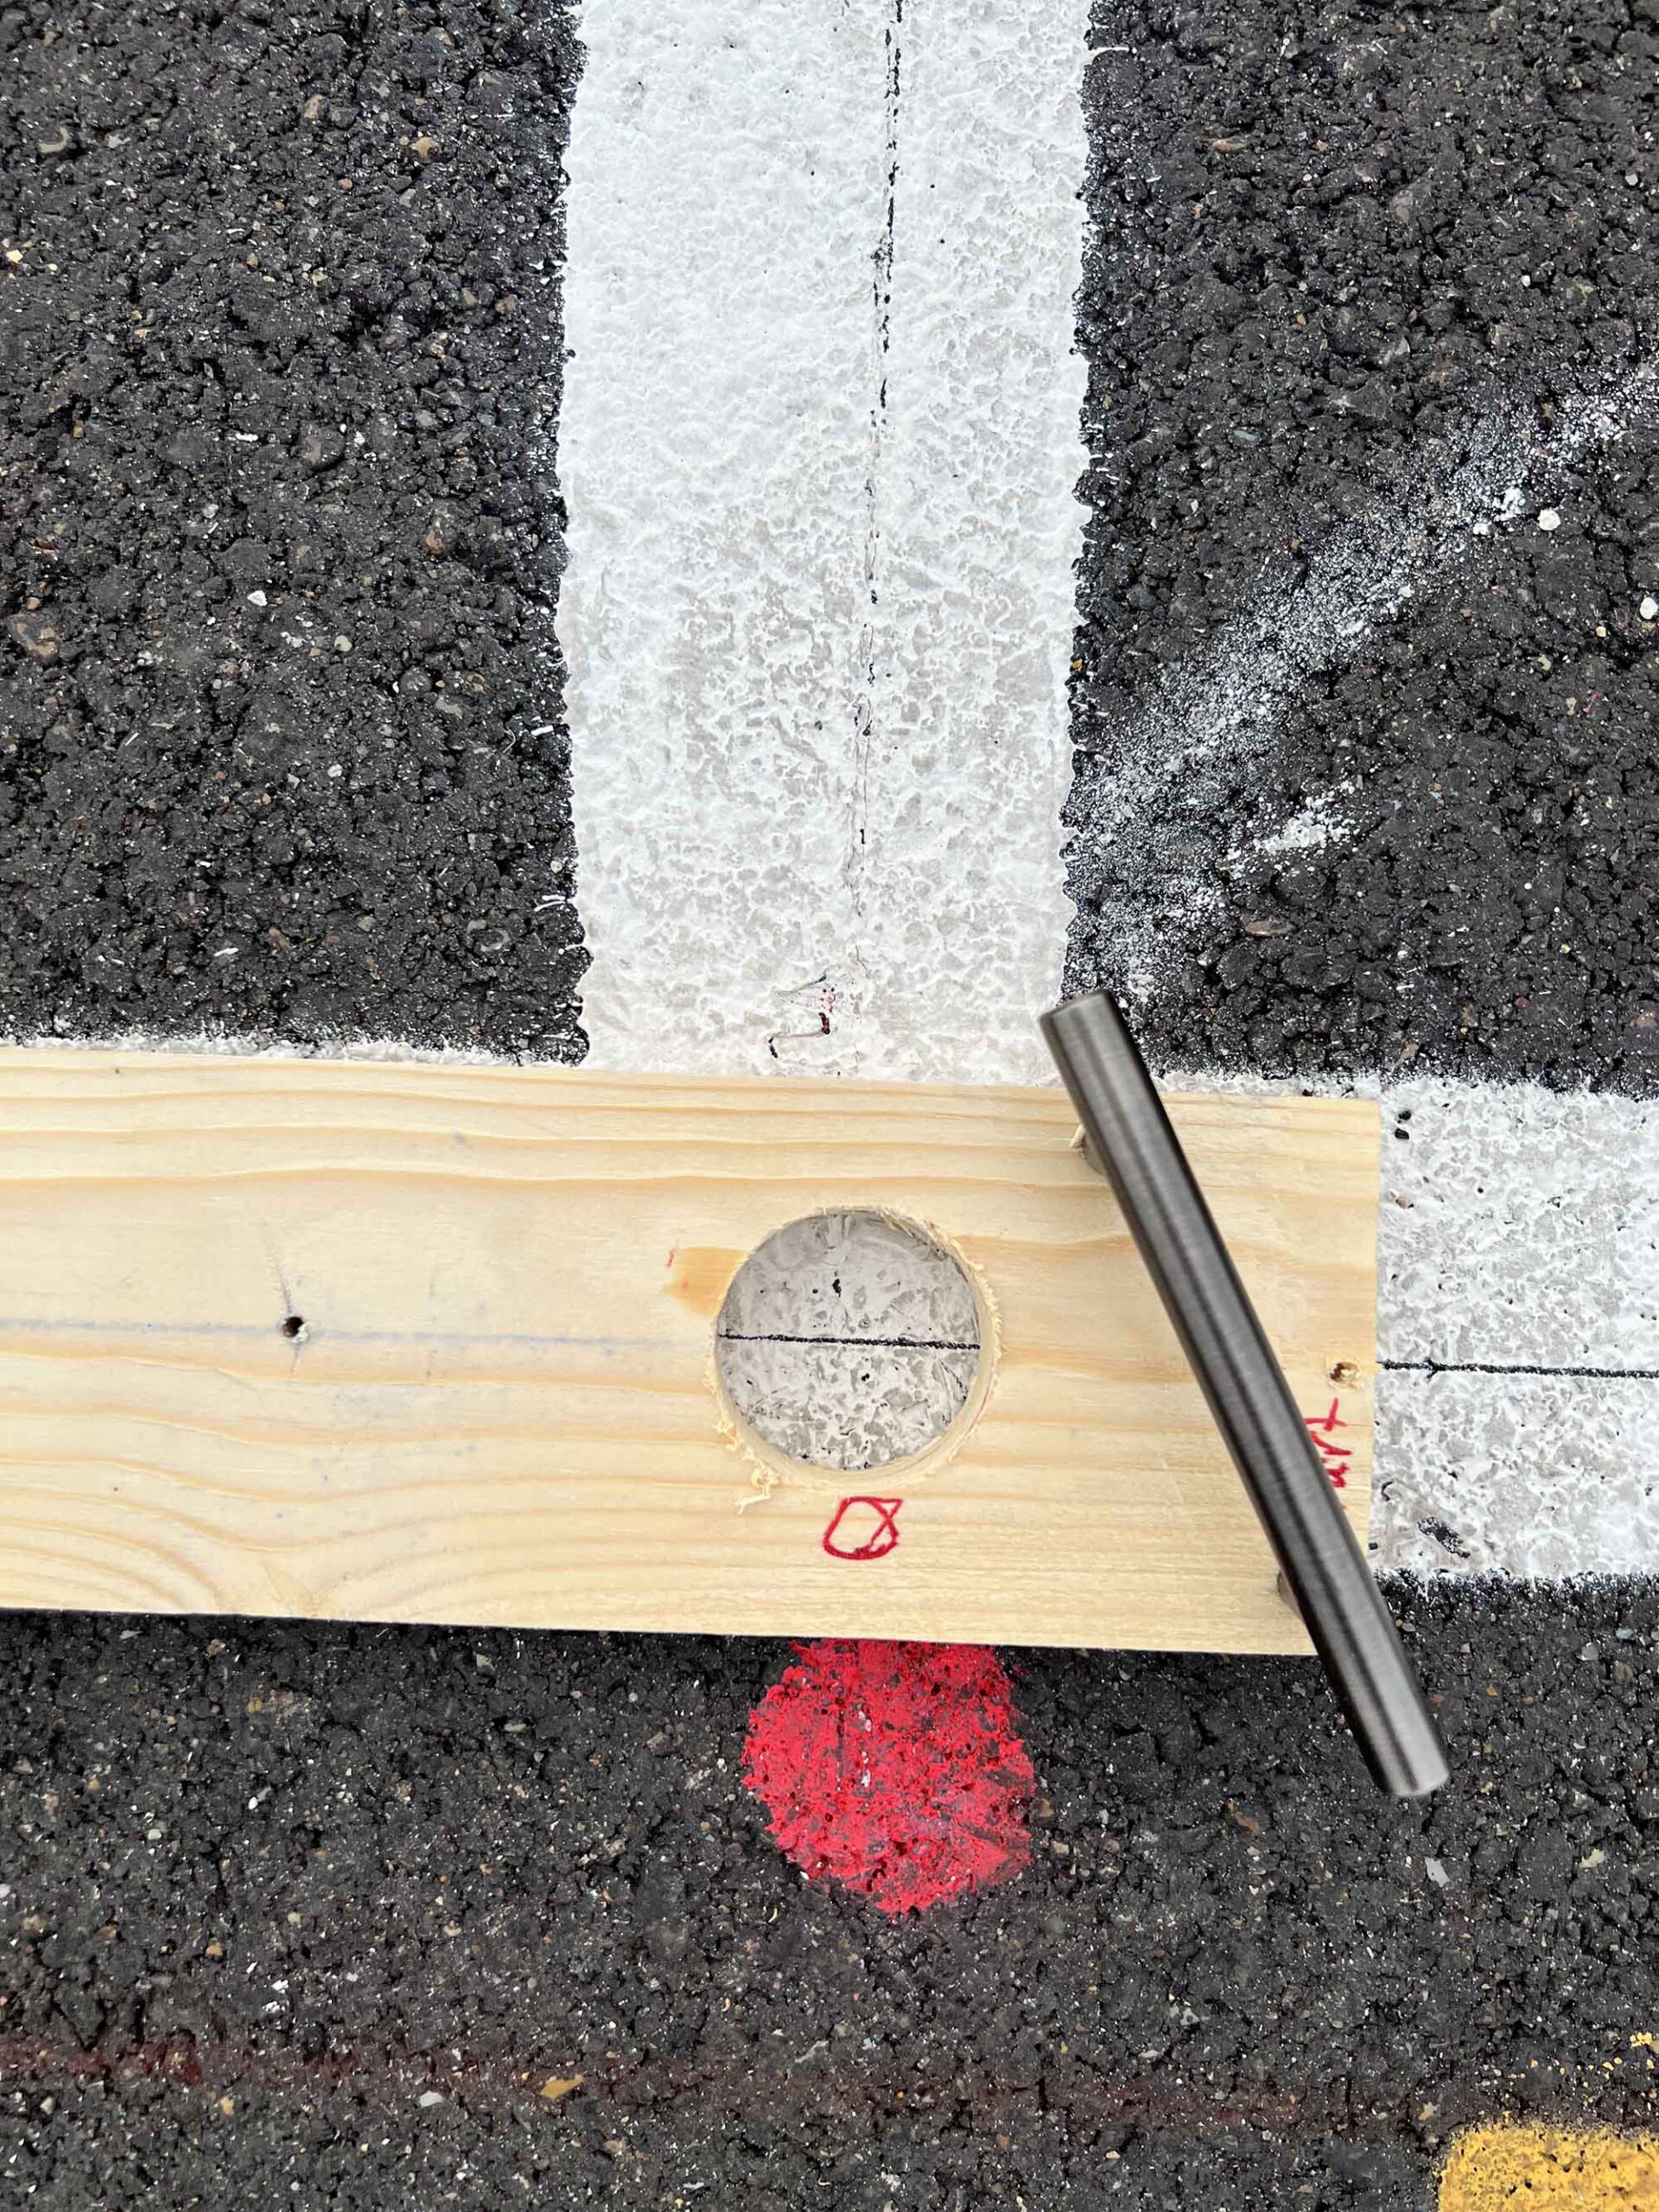
For our fields, we paint Blue at four-step intervals. So we do the line, the middle here, and then the next line.
Continue along the sideline until complete.
Step 2) Yard Lines: Do the same process as with the sidelines, but go up the yard lines. If you use NCAA hashes, this should perfectly line up with the home hash. Between Hashes is a bit of a conundrum because it doesn’t line up perfectly. I know some people have done a separate template between those marks – that is one option, expand it out to the correct measurements. For us, I don’t consider the step or so that it’s off between those two points to be that noticeable in forms due to the angle of viewing. Because of that, We go four sets of blue dots going back from the home hash, then catch a 4 coming forward from the visitors hash. You could adjust that further, but as long as you have a plan and it’s consistent I think it works.
You can see the double blue dots you end up with back to back when you meet up there.
As you paint you will find your template filling up with paint the more you do it. (Especially when you start doing every dot across and the 1-step dots later) If you have some of those disposable shop towels we had a designated person who would wipe off the template when it was carried to them after every yard line section on the across, and about every 7-9 moves on the other sections.

Step 3) Across the 4’s
For the next step, we go across the yard lines at the four steps. This will all be the 4-step color and should line up solidly across the lot. For this, like with the front sideline, be sure you start with your zero dot and go out from it with your template. Assuming you have measured correctly this should line up pretty well as seen in the photo below.
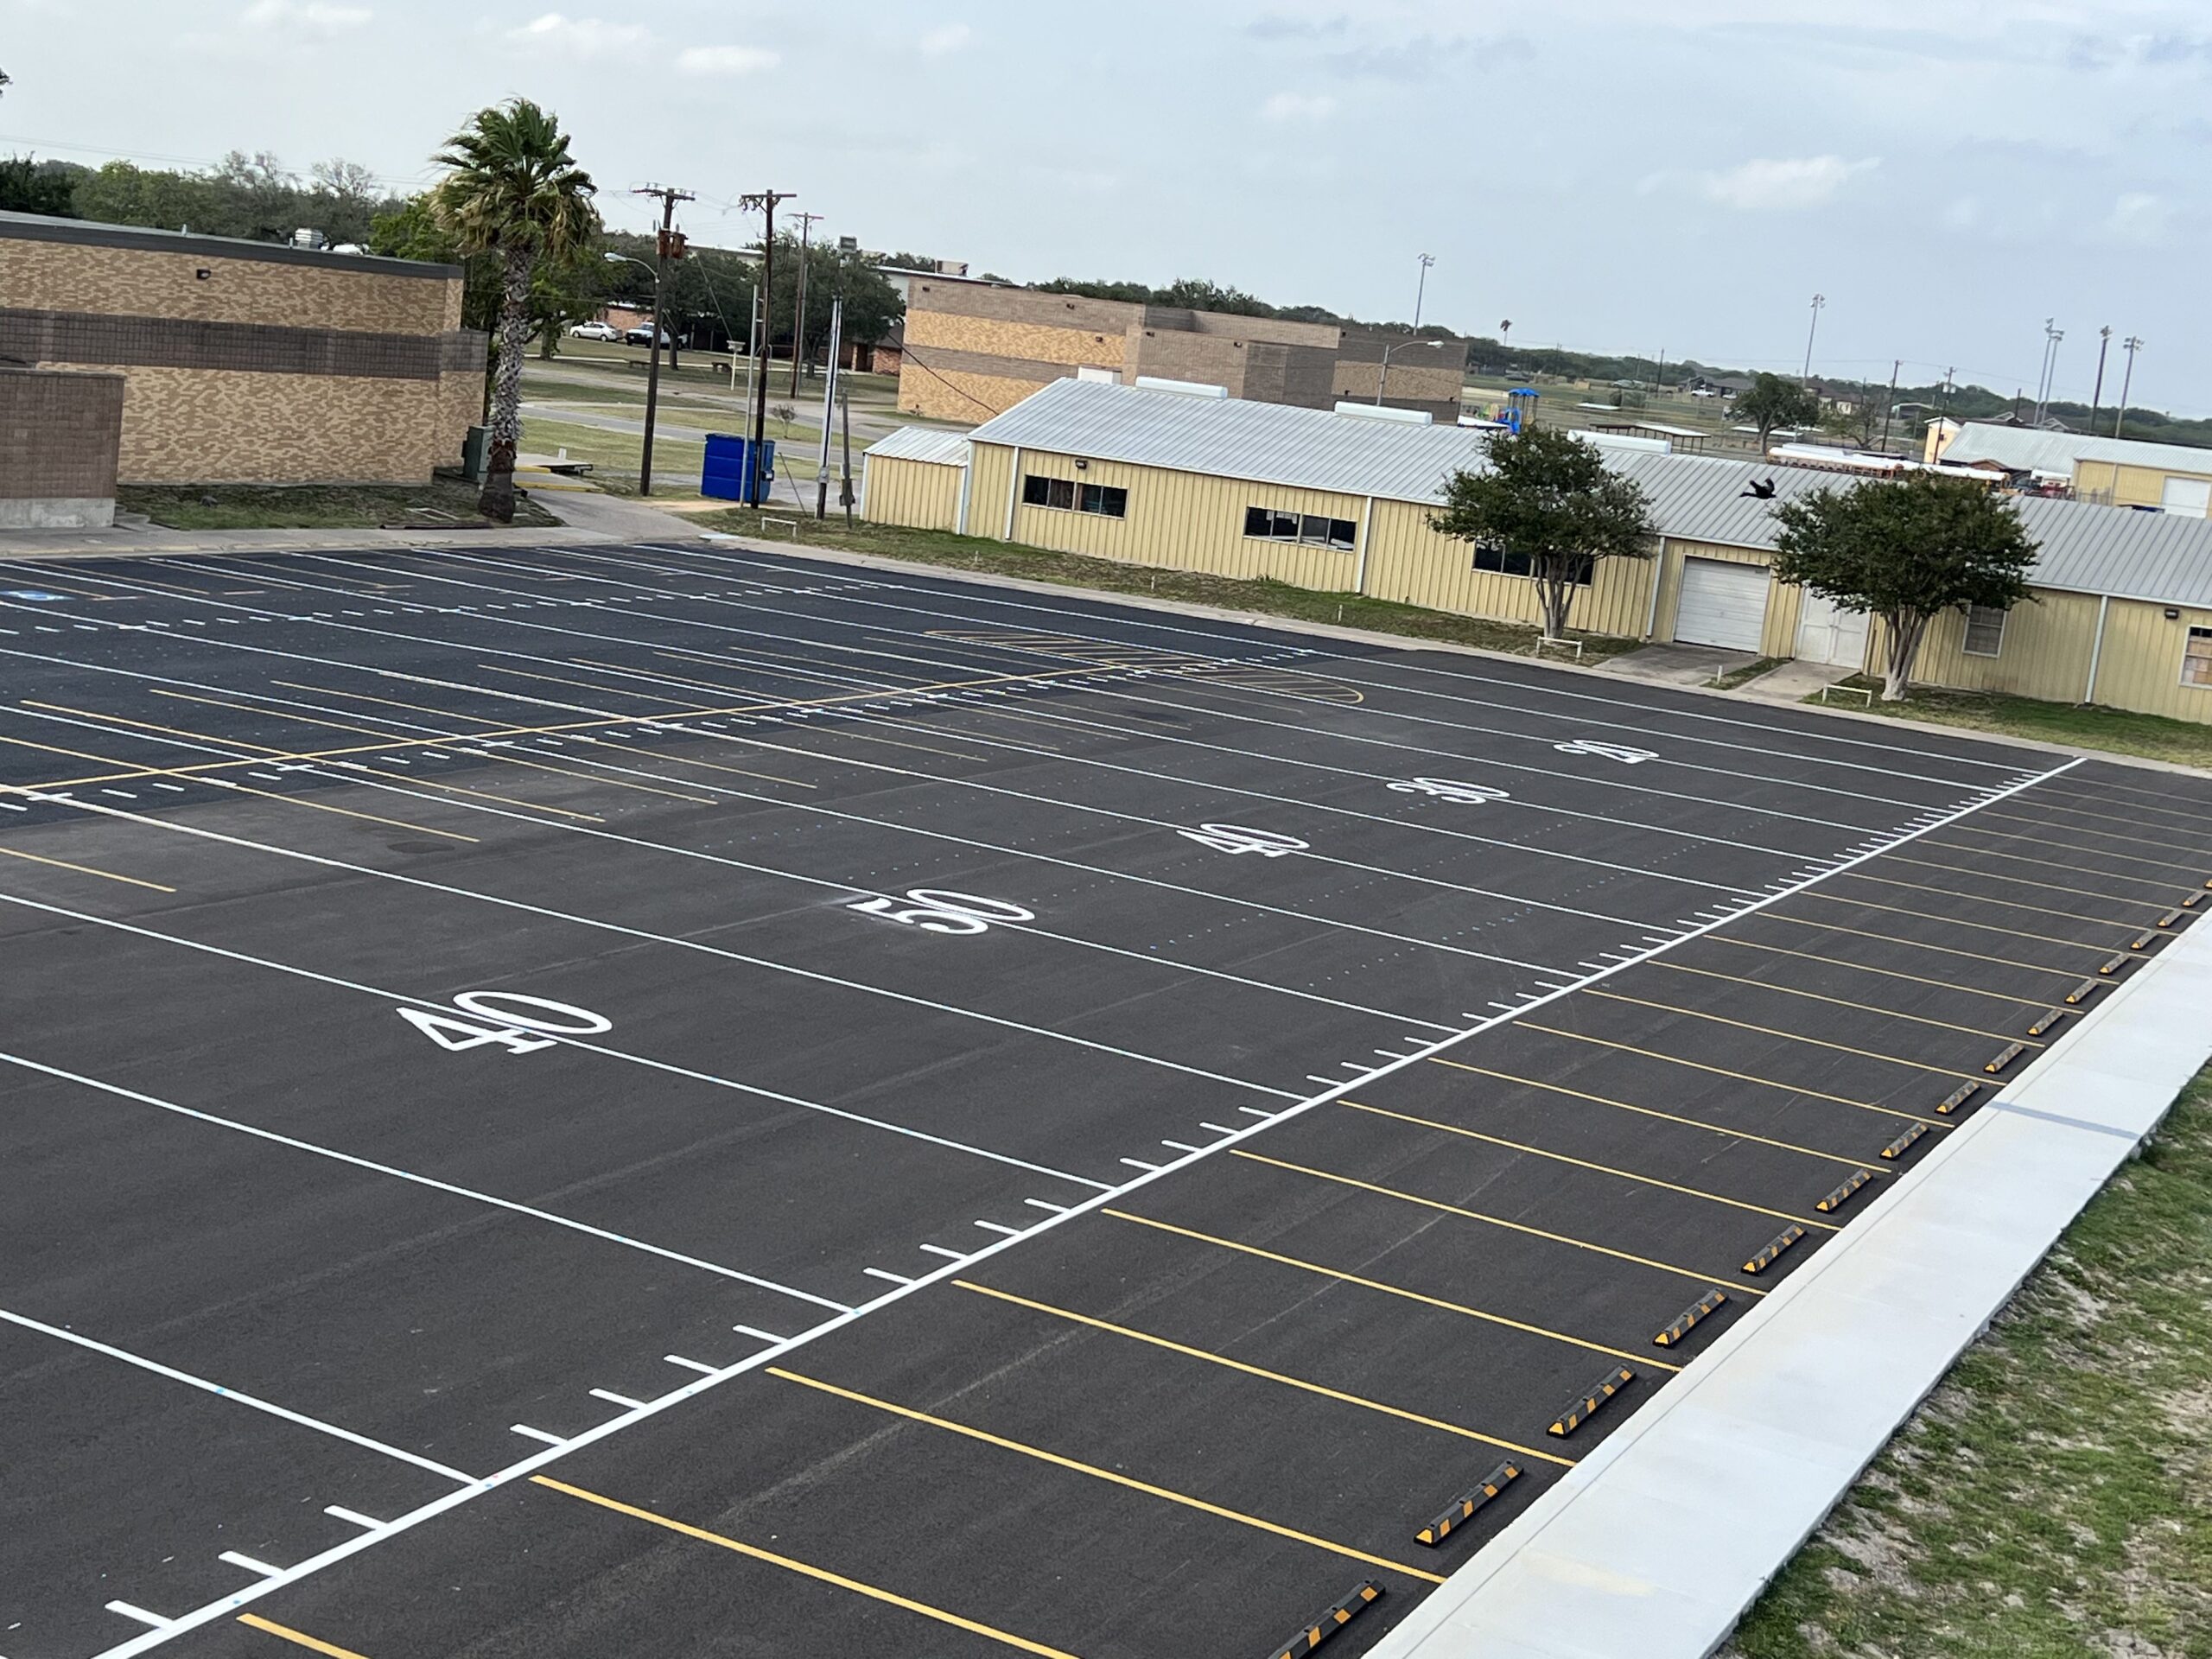
Step 4) 1 Step Intervals/2 Steps
So for this next step go in the same order of Sidelines then yard lines to fill in the second color at the 1-step interval. Your blue spots should line up with everything as you go across and fill in the second color in every dot on the yard lines.
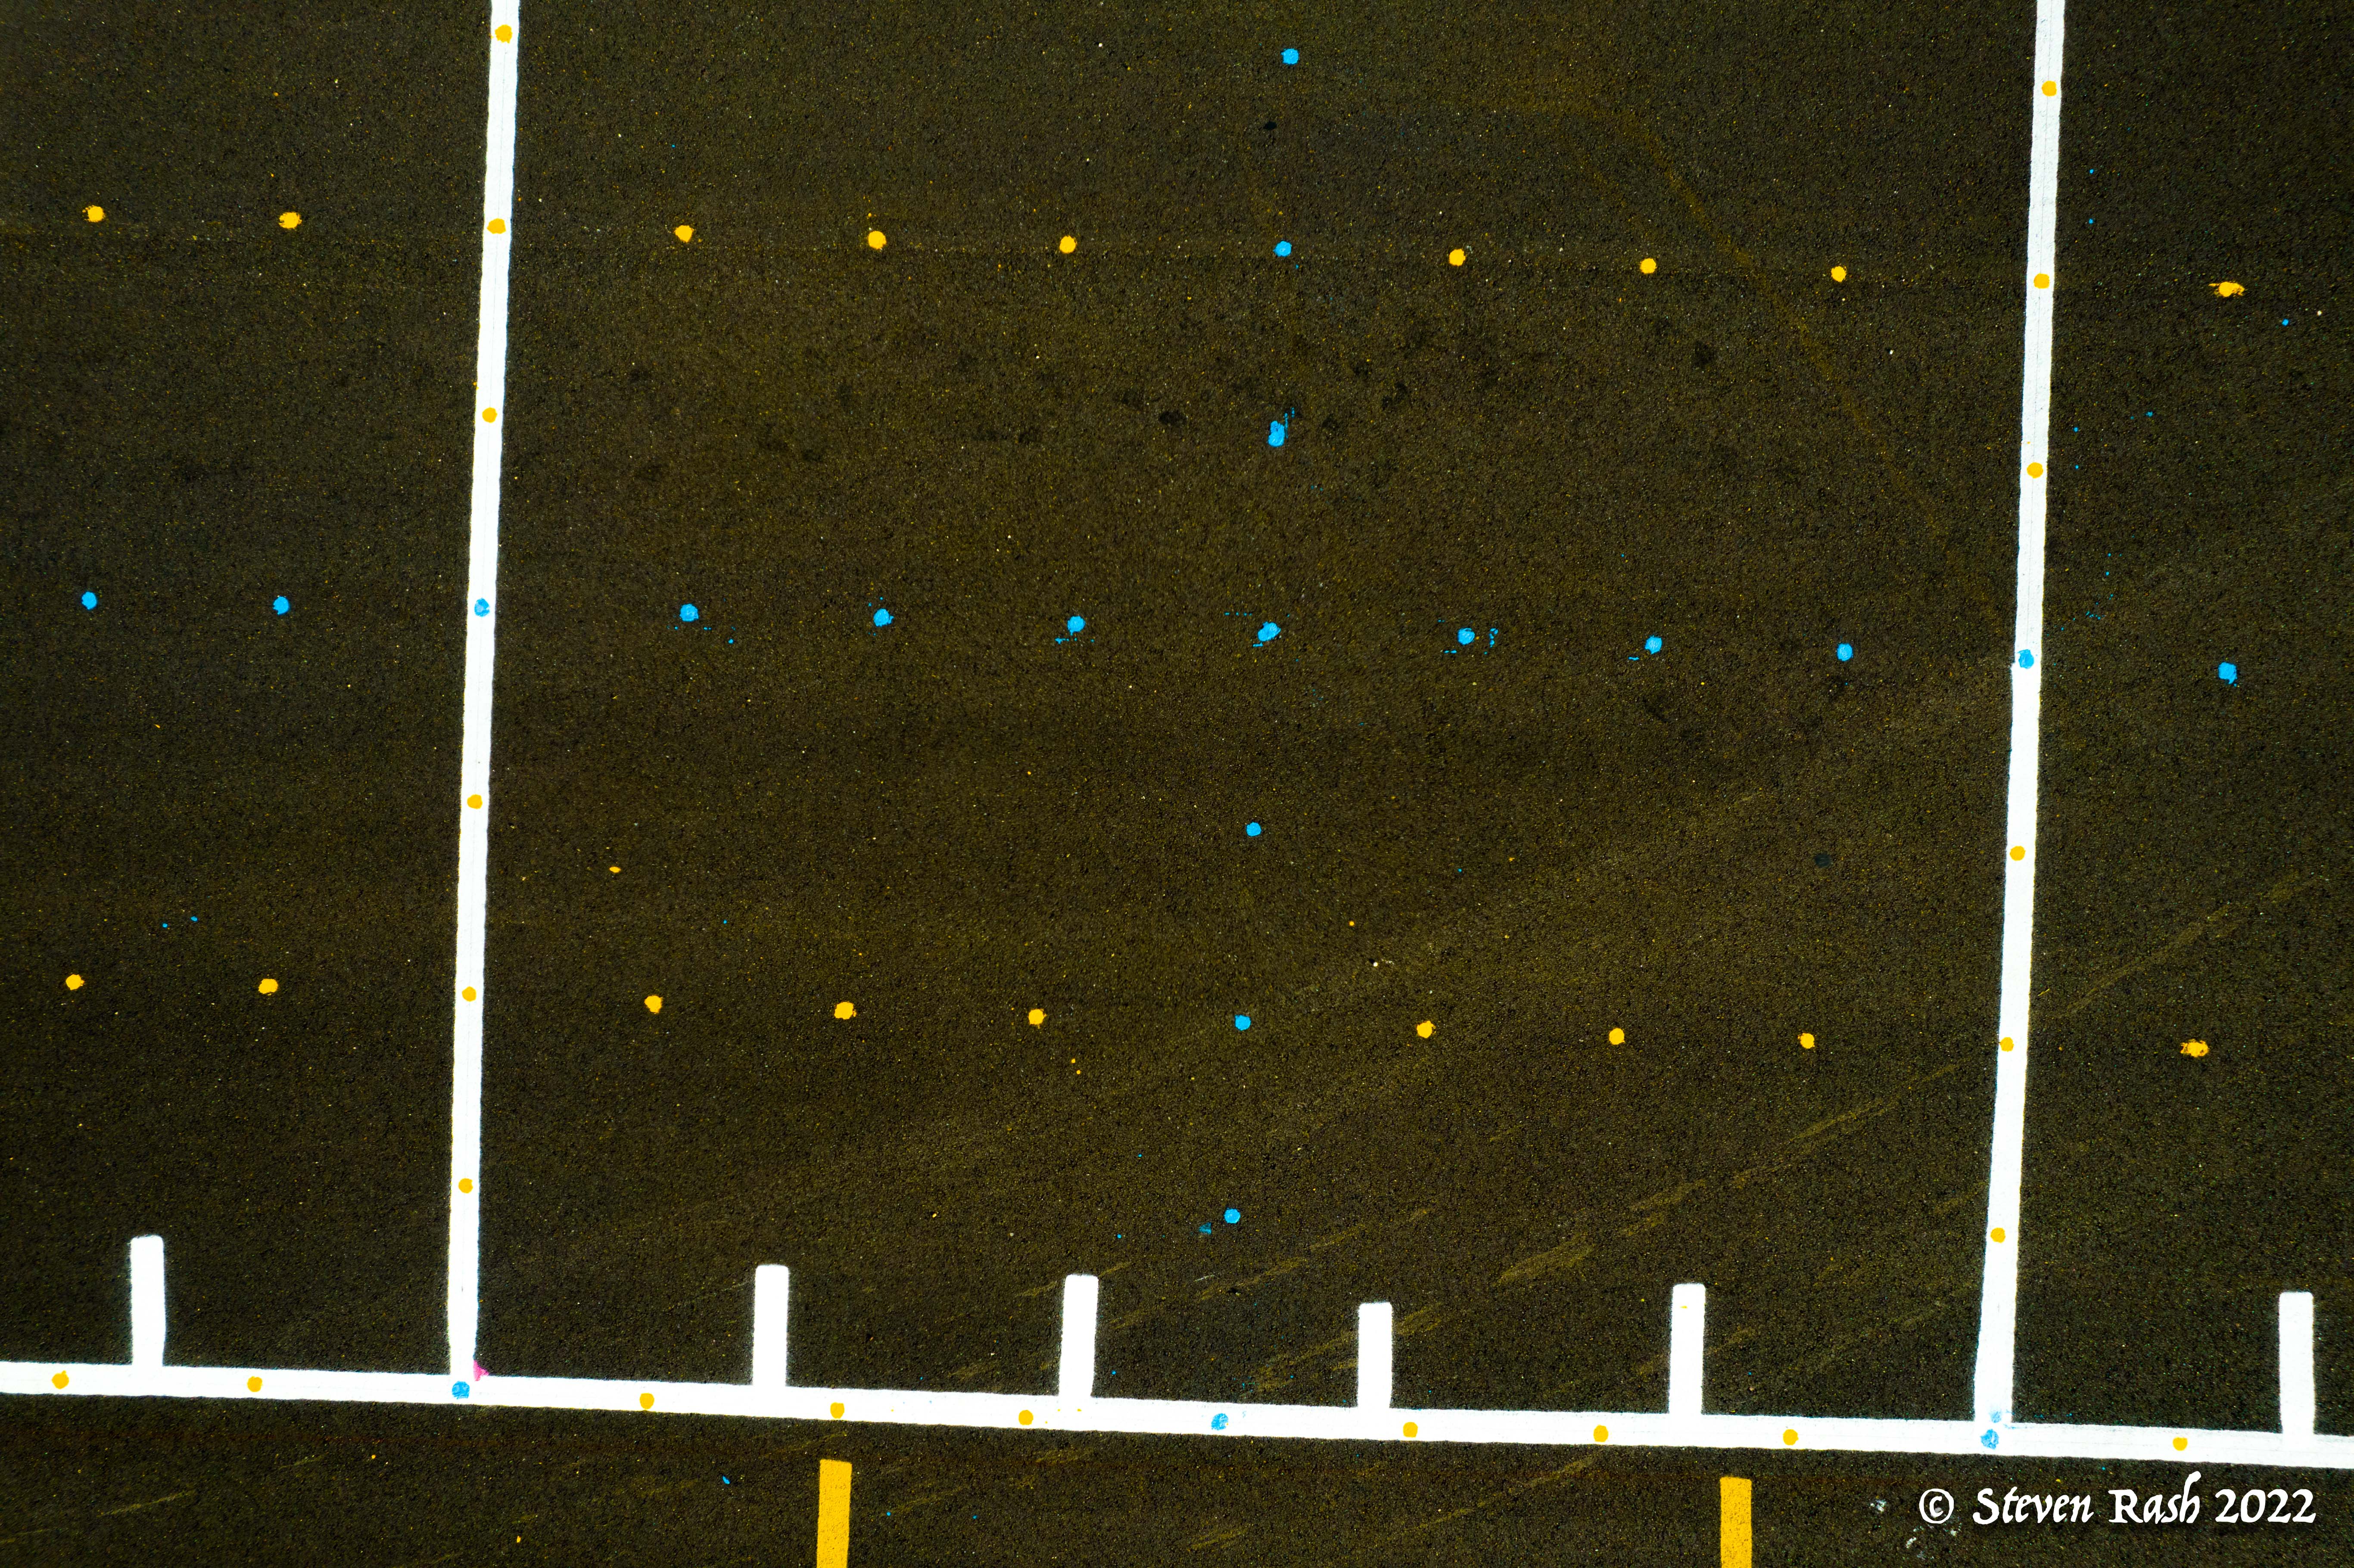
Step 5) Across at the 2’s or 1’s
I feel like going across every step across is a little overload with information. This is going to be something that varies from your perspective though. We only go every step across at the 2 steps as shown above. They have the every step spot on the yard line and can use the others to guide more than adequately. The only downside of doing the EVERY step you will possibly run into is at that point your inaccuracies with the grid will show even more. If you find yourself more than a little OCD that may not be worth the extra dots!
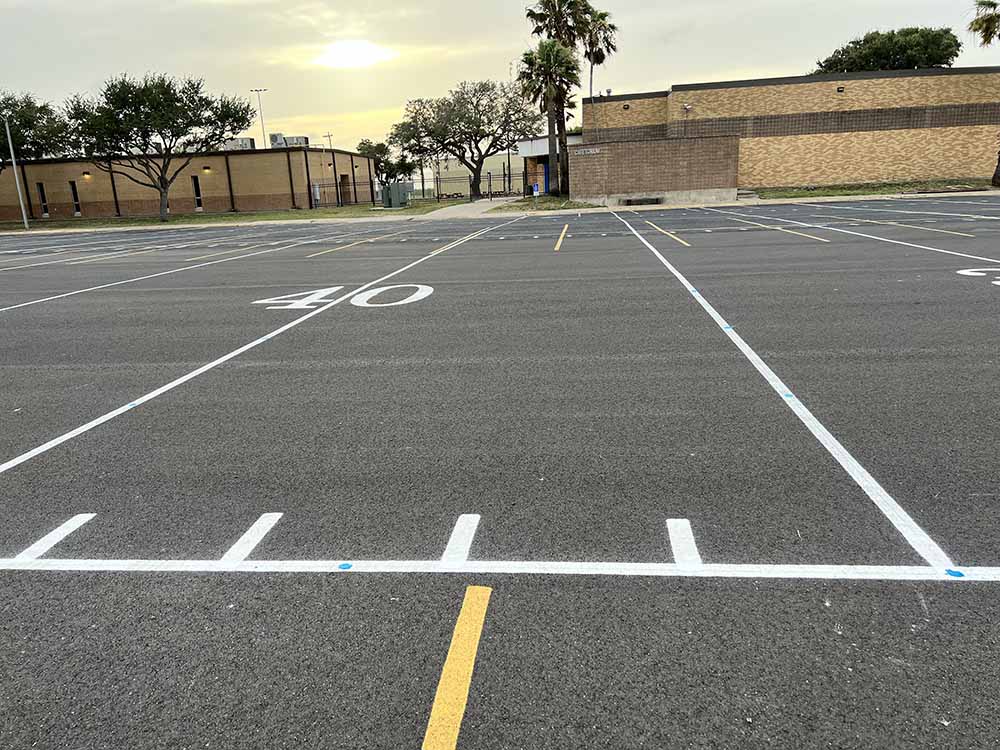
When you complete this step, you should have ended up with something like this!
By all means, you could paint your field logo and add some other marks, but just having this information alone will improve your rehearsals dramatically!
If you have any other questions about the process please feel free to reach out to me!